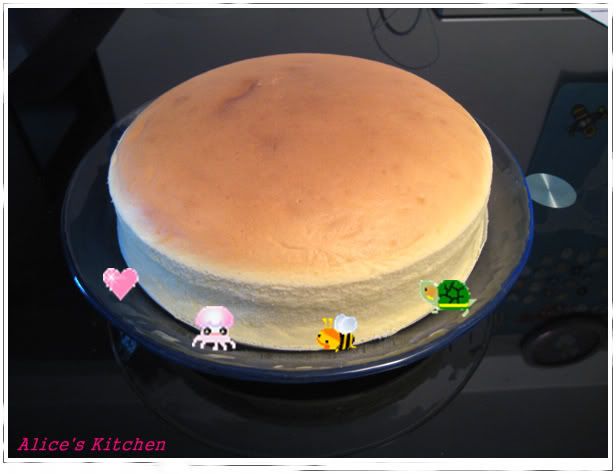
今日整咗個我老公唯一會食既芝士蛋糕, 就係日式芝士蛋糕喇!
今次我係跟為食貓既食譜做既, 好成功, 好好味!
最緊要張生啱食!wakakakaka
我係用咗3個蛋既份量, 整咗個7吋蛋糕
材料:
8吋份量 3個蛋的配方 2個蛋的配方
忌廉芝士 200克 170克 100克
牛奶 128克 109克 64克
無鹽牛油 43克 37克 22克
低根麵粉 26克 22克 13克
粟粉 14克 12克 7克
蛋黃 4個 3個 2個
檸檬汁 ¼茶匙 沒有加 隨意可省
蛋白 4個 3個 2個
糖 86克 73克 43克
塔塔粉 ¼茶匙 ¼茶匙 ¼茶匙或更小
製作:
1. 忌廉芝士切成小塊,加入牛奶浸泡30分鐘。無鹽牛油隔熱水坐溶。 2. 浸泡30分鐘後隔熱水加熱,一邊攪一邊加熱至無顆粒,再加入己溶化的無鹽牛油拌勻,熄 火稍稍放涼。 3. 篩入低根麵粉和粟粉拌勻,再加入蛋黃拌勻,最後加入檸檬汁拌勻。此時麵糊光滑無顆粒,如仍發現有小許顆粒,可將麵糊過篩到乾淨的mixing bowl中,待會與蛋白霜混合。 4. 蛋白打成粗發泡後,加入塔塔粉打勻,糖分三次加入打至企身,提起攪拌頭,蛋白的尖峰會下垂。(Clarey 會在頭兩次用高速打發蛋白,每次1分鐘,在第三次用低速打,直至想要的硬度。這樣可以令蛋白沒有很大的氣泡,製成的蛋糕質感軟綿細密,外觀也很好。) 5. 取1/3的蛋白與麵糊混合,再將麵糊倒回蛋白霜中輕手混合直至單一顏色就好。 6. 倒入模具,然後拿起模具在”木台”上輕敲幾下。 7. 用蒸焗法(即是放圓模在加有熱水的焗盤上),放入己預熱的焗爐以170c 焗15-20分鐘至表面上色,然後調較至150c,打開焗爐門,直至加熱顯示燈再次亮起,關閉焗爐門,焗40分鐘。在最後的10-15分鐘,要留意蛋糕的色水,如已達到你想要的色水,可加鍚紙在蛋糕面避免蛋糕表面太深色。 8. 出爐後放在綱架上稍稍放涼,用小刀界開蛋糕邊和模邊(其實不會太「痴」的)只是希望蛋糕出爐後沉降得靚一點。然後小心脫模。(小心熱) 9. 蛋糕可襯熱食,也可放涼後食,不用放入雪櫃。
12 comments:
我又要食...但唔想整haha
好滑呀
I like japanese cheesecake too.
I had made one long time ago ,it tasted good.
Rebecca T.
我都好鍾意食黎個蛋糕... 真係超級正既食譜呀!
焗得好靚呀!
我又想食件喎!嘻嘻!
Hi Alice!
This is exactly what I wanted to make for a long long
time!! Thank you for sharing your recipe!
蒸焗法(即是放圓模在加有熱水的焗盤上)that you mentioned in
the cooking process, is the water supposed to go over the
cake tin? Or you mean putting the cake tin on a tray
while there's water in?
Thank you so much for your effort!!
Happy Chinese New Year!!
Wing Yi
Hi Wing Yi,
蒸焗法是將個蛋糕模放在已注熱水的焗盤上, 然後再放進焗爐.
Happy Cinese New Year!!!
Hi Alice!
Gong Hey Fat Choi! Wish you a very happy Rat Year 2008!
I have made this Japanese CHeese cake yesterday, it's
beautiful as exactly the one I wanted!
However, the presentation doesn't look too amazing so I
will have to work on it a bit. Also I did spend longer
than what you advice on baking this cake, and that's why
I'm getting more advices from you now.
Do you us the water bath (蒸焗法) through out the entire
baking process? I found the cake wasn't cook with the
suggested time!! :( so I had to bake the cake on its own
without the water bath for 20 - 30 mins to achieve the
ideal texture of the cake.
Thank you Alice!
Wing Yi
Hi, I m new handed baker, I follow all the steps
in your resepi to bake the cake but at the end it
turns out flat.
can you please let me know why?
Hi Amily,
請問你係咪用蒸焗法(將個蛋糕模放在已注熱水的焗盤上, 然後再
放進焗爐.) 個蛋糕模要包好, 不能入水.
Thank you for replying me. I did use water bath,
but I use normal baking pan which do not need
wrapping with aluminium foil.
The surface of the cake didn't craked, the cake
tecture is fine.
好漂亮的日式芝士蛋糕 ^^
Post a Comment